Adobe Lightroom for iPad is used to touch up, synchronize, organize and share photos. It supports the RAW format, and it’s a perfect for both lovers of photography and for professionals.
It was designed by Adobe as a complement to Lightroom desktop for Mac and Windows, but it’s also great as a standalone product.
Let’s have a look in detail to see how this powerful and versatile accessory for photographers actually works.
How to Get Started
To use Lightroom, you have to have an Adobe ID, which you can create on this page.
If you want to use the sync features with Lightroom desktop, you must have the program installed on your Mac or PC, and have activated one of the Creative Cloud plans from Adobe.
Adobe offers a 30-day trial for both Lightroom desktop and Creative Cloud so that you can test the package. Once you start the trial, you will have access to all the tools.
Minimum System Requirements
The app is free and is compatible with iOS 7, and works in tandem with desktop Lightroom 5.4 and later versions.
To use Lightroom 5 Desktop, you must have a Mac running OS X 10.7 or later, or a Windows PC with Windows 7 SP 1, Windows 8, or Windows 8.1.
Synching is just the beginning
If you have the latest version of Lightroom desktop installed on your computer, all you have to do to sync photos is to enable the Sync option. To do this, select a collection (left column, Collections), click on the right mouse button, and select the option: Mobile Sync with Lightroom.

Lightroom 5.4 for Mac
You can also add photos by importing them from your iPad, or by taking them directly from your DSLR camera. To do this, you must have the appropriate adapter to connect it to the iPad (iPad Camera Kit).
The procedure is simple: connect the camera to the tablet, import the photos you want, and then open Lightroom Mobile. Create a new collection using the “+” button in the upper right corner, and then tap Add from Camera Roll.

You will then see all the photos on the roll, but those that you’ve imported are not there: they are imported into an album on the Camera app. To find them, you have to touch the drop-down menu Add from Camera Roll at the top center, select All Imported or Last Import, and choose the photos you want to import into Lightroom.

Hello RAW files
The big news for Lightroom mobile is support for RAW format files at editing level, an important turning point in the world of mobile device apps, and a small milestone for the world of photography. Adobe already announced this revolution almost a year ago, and now it has finally taken shape in Lightroom Mobile.
In practice, this is possible thanks to the app that makes a Smart Preview, which compresses the RAW file (or NEF file for Nikon users) into a compressed DNG, which can be easily managed on an iPad.
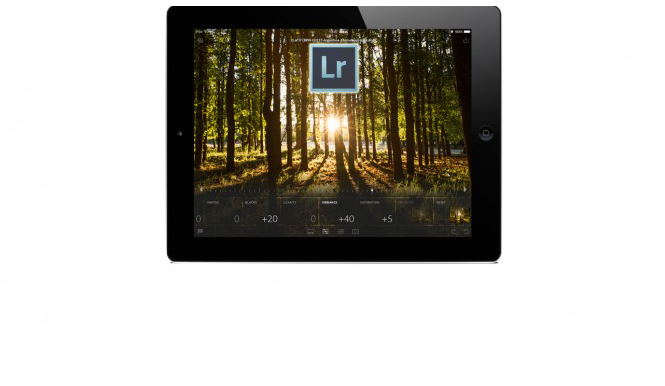
Lightroom Mobile tools
There are lots of image editing tools, and the controls are well adapted to the touchscreen of the iPad. The workflow is fluid and instinctive for any type of user.
From the toolbar at the bottom, you can access the 4 main tools.
The first is the Filmstrip (gallery), and it’s from here that you can select the photo you want to view or edit by selecting a thumbnail.

The second tool is Adjustments, and offers a rich set of tools for editing. When you edit, you can always compare the original image and the edited photo by placing three fingers on the screen, outside the perimeter of the picture.

You can edit various things like setting the white balance of a shot by selecting the type of lighting there was (there are classic options including direct sunlight, shade, cloudy, and tungsten light), or by choosing the right color temperature.

When you use a tool that’s adjustable with a slider, a double tap returns it to its initial value.
The other tools available are Tint, Auto Tone, Exposure Value (EV), Contrast, Highlights, Shadows, Whites, Blacks, Clarity, Vibrance, and Saturation.
The resulting images are of a very high quality. There are very few tools as powerful for mobile devices, and perhaps none combine the abundance of options that you can adjust using Lightroom, with such a well designed interface that’s simple, instinctive, beautiful, and complete.
The third tool is Presets. This includes a number of preset profiles, like the ability to transform a photo shoot in black and white, or to filter out the colors or apply effects.

They are effective tools because you can achieve changes that would require a lot of work with a photo editing program. The intensity of the effects is well calibrated, and the results are always compelling and usable.
The fourth tool, Crop, lets you crop photos with different proportions (e.g. 16 x9, 4 x 3, 11 x 8.5). To reverse the axis and move from a horizontal view to a vertical view, or vice versa, it just takes a tap of the Aspect button.

No matter which editing menu you’re using, tapping on the photo gets rid of all the tools and all the information from the screen, leaving only the image.
Being able to see the photos without distractions is the best way to evaluate it, and at that point, the tool is a welcome addition. In this mode, you can also use a three finger tap to compare the original and edited photos.
Edit, organize, share
Lightroom mobile is the perfect tool for photo enthusiasts who are serious and professional about their photography, for more than one reason.
The first, which impressed me the most, is the careful selection of editing tools that Adobe has made available. Whether you’re a professional, or just taking photos for pleasure, you’ll immediately notice that the app delivers exactly what you need (practically nothing is missing, but it’s also not excessive) to edit the photo and perfect a really good shot, or just correct an error to make an image even nicer.
It’s also immediately evident that the quality of the algorithms is high, it has excellent usability, and the workflow is quick and pleasant; there’s probably no other product on the market (at least for free), that offers this much.
The editing is as easy as it should be, and the synchronization options with Lightroom desktop are great because it means that you can always have essential retouching and editing tools with you. Similarly, with Lightroom for desktop, you can edit in much more depth, if necessary.
Finally, the options that let you sync and share photos are designed to meet the needs of real photographers at all levels, but are especially useful for professionals.

In short, Lightroom mobile is a product that has been missing in the photographic landscape, and not only is it here, but it also works well.
Personally, as an amateur photographer, I’ve already started using it a lot because it makes things possible that I’ve wanted for a long time: it lets me not only have my digital SLR with me, but also a handy tool to upload my shots, process them, and post them or share them instantly.
But it’s not just Lightroom that helps photos come alive. If you want to embrace the world of social photography, read our Complete Guide to Instagram.