 WordPress is the best blogging platform out there in my opinion and I was delighted when they introduced free hosting on WordPress.com. However, there is one big disadvantage of this – you can’t make money from your blog if it’s hosted on WordPress.com. WordPress prohibits the use of advertising programs such as Google Adsense on their domain so your only option is to get your own hosting platform. Normally this costs around $50 a year for a basic hosting package from options such as BlueHost and DreamHost. Note that they always advertise their prices per month e.g. “$6.99/mo” but with most hosts, you pay for the full year up-front.
However, if you don’t see why you should pay for something that you’ve enjoyed for free, or just want to try-out a hosting service before paying for one, then here’s a quick 3 step guide to transferring your WordPress.com blog onto a free host.
1. If you already have one, export your current WordPress.com blog into an XML file
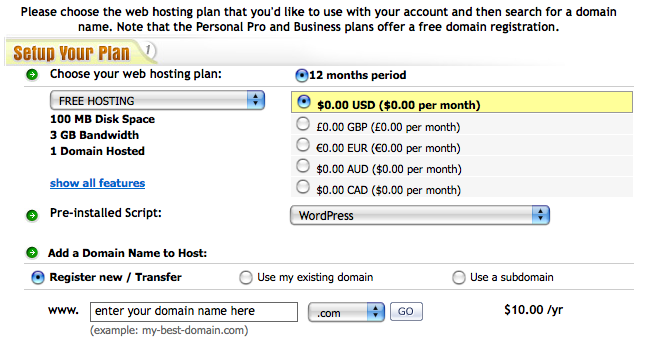
2. Sign-up for a free hosting account. I chose to sign-up with 100WebSpace. During sign-up, make sure you select “WordPress” as your pre-installed script. This installs WordPress automatically for you on your host and saves a lot of technical hassle for you later-on. If you already have a web domain address for your blog (e.g. www.myblog.com), you can click the option transfer it. Alternatively, you can use one given to you by the host (e.g. www.my blog.100webspace.net) or finally, you can purchase a name of your own choice for $10).
Note that there are two main disadvantages of using a free host (at least with 100WebSpace anyway):
– You will have an advertising banner permanently placed at the top of your blog (which is why the service is free).
– You won’t be able to use WordPress plugins such as comment spam blocker Akismet and WordPress Stats because the free service does not allow outgoing connections from WordPress to the host server. This is why when you receive your confirmation e-mail from WordPress to say that the blog has been setup on your host, there is no API key which is essential to validate such services. As regards spam, you’ll just have to see how it pans-out for you – you may or may not be plagued by it. As regards stats, you can simply install a third party application that doesn’t require communication with the host server such as Statcounter or Clicky.
3. That’s it! You’ll receive an e-mail from your host giving you login for your control panel where you can upload files to your domain including WordPress plugins and themes. You’ll also receive an e-mail from WordPress with your login details. If you’re importing posts and comments from your old blog, you’ll need to import the XML file you exported earlier.
If you’ve never had your own host before, then it may be a bit intimidating learning how to transfer plugins, themes and other files to your host although there’s some useful tutorials here. Using your own domain to host WordPress is a little more tricky than having it hosted at WordPress.com because at WordPress.com, they do all the hard work for you like providing themes, plugins and stats but if anyone wants me to go through this let me know.
Once you’ve got to grips with it though, you’ll find you have much greater control over how your blog looks and works with loads of great user generated themes and plugins to choose from. Most importantly, you may be able to start making money from it. 😉